A Drawing tutorial that outlines essential information to help draw engaging faces.
The face is the first point of engagement when it comes to evoking emotional responses.
A well drawn, accurate facial expression will connect with your audience even if it’s exaggerated and not quite life like; it can be cartoony and still be relatable. By understanding the core principles of what makes a face human and relatable, we can instill it in our drawings and evoke an emotional response from our audience. The rest of the article will provide some golden nuggets of information that you can learn and practice to instantly improve how you draw faces.
An approach to drawing Faces from reference
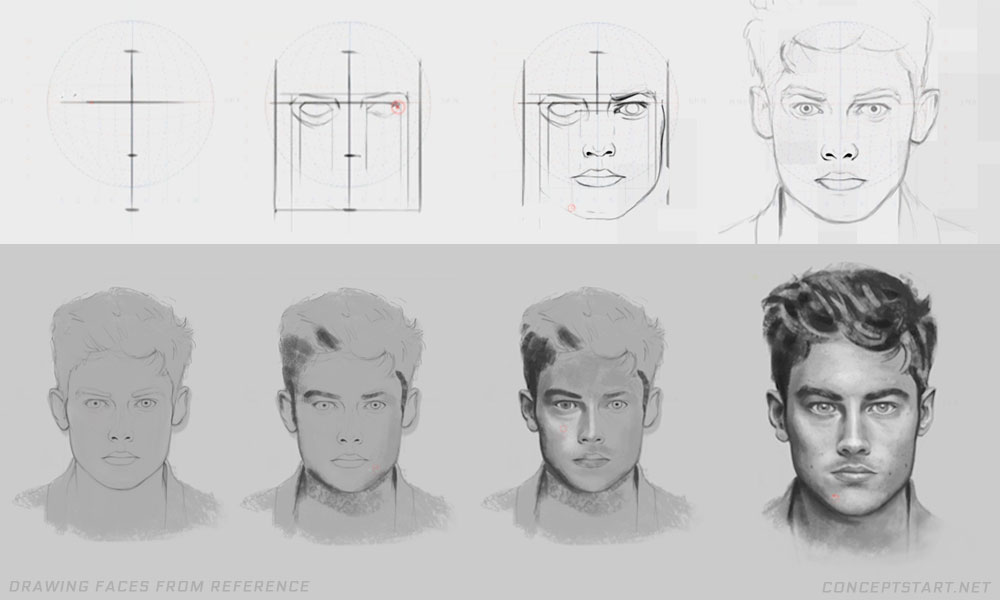
Using a similar approach outlined in 'Learning to draw with shapes and angles' can be used here, but also baring in mind the proportions of the face.
- Start out by utilising some basic guidelines and markers that I can use to build up the face
- Find the largest shapes and work within them.
- Compare these shapes to each other, using the lines and markers to consider the distances between; This helps to place them with more accuracy.
- Keep refining until I’m happy with the result so far.
To shade in, it’s ideal to start with a middle grey value, and then work in the shadows and light areas to build up the volumes of the face. Be sure to keep comparing your drawing with the reference to make sure the lights and darks are built up correctly, and accurately define the features of the face.
The version drawn isn’t identical... I should have kept refining and fixed errors such as the facial proportions, and lighting before moving onto shading, but it’s ok for a study (and was used for the Face Drawing Video).
Important Information About The Face
The following bits of information are important to learn and understand. You'll gain a thorough perspective of how the face is constructed, which will help you to draw the face with more conviction by reconstructing it from memory.
Facial Ratios
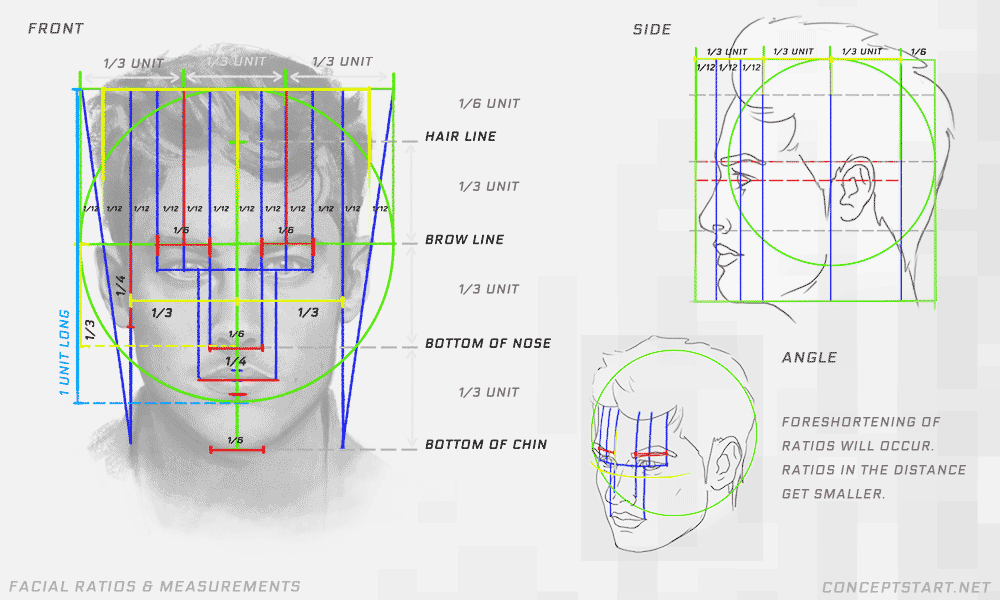
So as you can see, the face typically has a set structure. We can break the face down into ratios that will help us eventually draw accurate faces from our imagination.
If we take a circle and break it down into 3rds we can start to apply these ratios.
We can begin to measure the face from the centre point of the circle. The middle line being the brow line, and then we have roughly the size of 1/3rd of the circle above the brow line, and then two more sections of 3rds below the brow line for the bottom of the nose and chin.
We can keep on breaking up these main sections into smaller segments and see the patterns of division across the face.
Cheekbone to cheekbone is ⅔ the size of the circle across, the mouth is rougle ¼, the eyes are ⅙ of the circle. By understanding these ratio’s you’ll be able to draw with more accuracy, and ultimately place features correctly in your future drawings.
Face Ratios Side
From the side view of the face we see more ratios appear. The front of the face all seems to sit within 1/3rd of the circle.
Foreshortening The Face
Foreshortening will occur when the face is viewed at various angles, which means the lengths of these ratios will distort based on the viewing angle. When foreshortening the face, always start with the largest sections of the face first, and based on how much this is foreshortened, it’s much easier to measure how much to foreshorten the features within that area, considering the ratios.
The human Skull
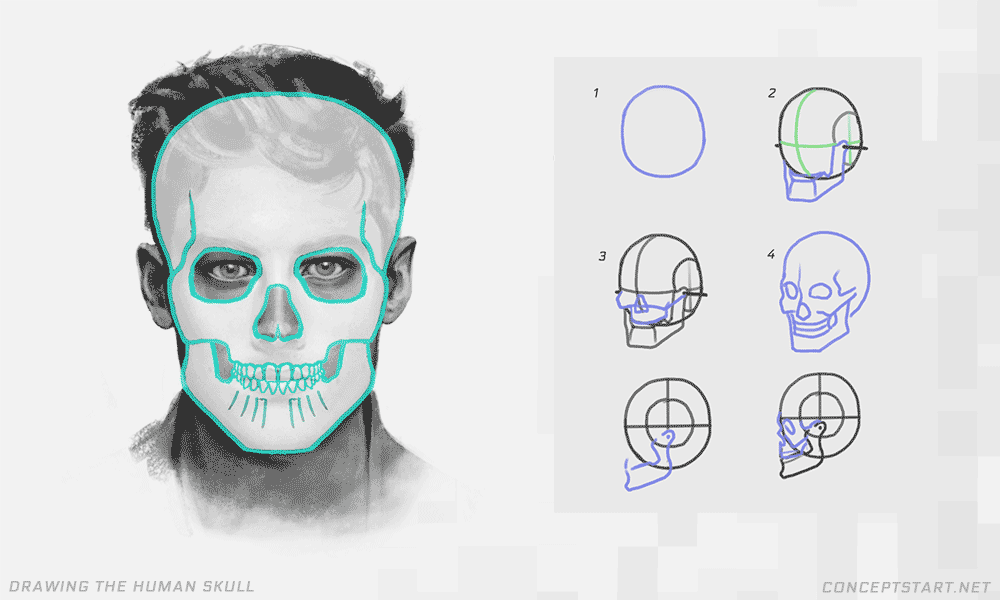
The skull is the foundation of the face, so by understanding this above all else, we can begin to truly understand how to draw the face from any angle. We'll be able to accurately figure out where the feature sit on the face, how far apart the eyes are, where to place our face markings for the cheekbones etc.
- We can break the skull up into into sections, the first being a ball for the cranium, with about ⅙ of either side chopped off
- The 2nd part is the jaw that sits below the ball
- Next we add the top part of the jaw and nose, imagine a pin going through the centre of a ball, that connects the upper and lower jaw together
- Then finally we can add in the remaining bits, such as the eye sockets and refine any angles
Facial Muscles Muscles
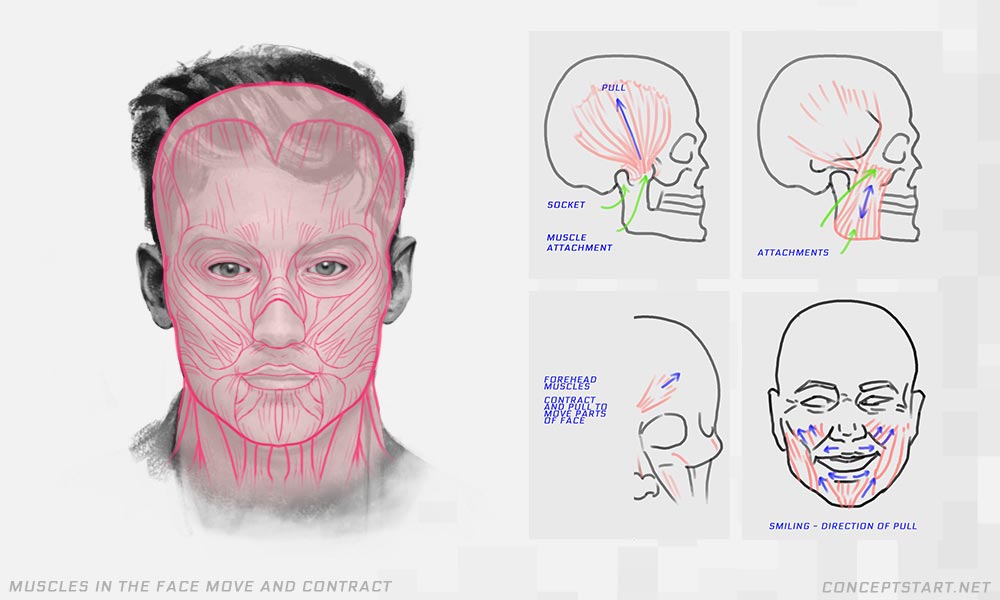
Overlapping parts of the skull and jaw are muscles that hold everything in place. These muscles are responsible for pulling and pushing the jaw and creating all the different facial expressions.
These muscles contract and expand causing markings on the surface of the face to appear. Where muscles converge, the skin crumples up and reacts to the pushes and the pulls of the muscles, prominent bones and so on.
The skin reacts like the earth's surface react when the plates underneath collide to cause an earthquake.
And so we see how the flesh or skin appears depends on the contraction of muscle. Young flesh is firmer than older flesh so less wrinkles will appear.
We should also consider that over time, the skin sags, and the emotions begin to crease our face like worn boots! We should factor these things in when drawing specific types of faces.
Facial Markings
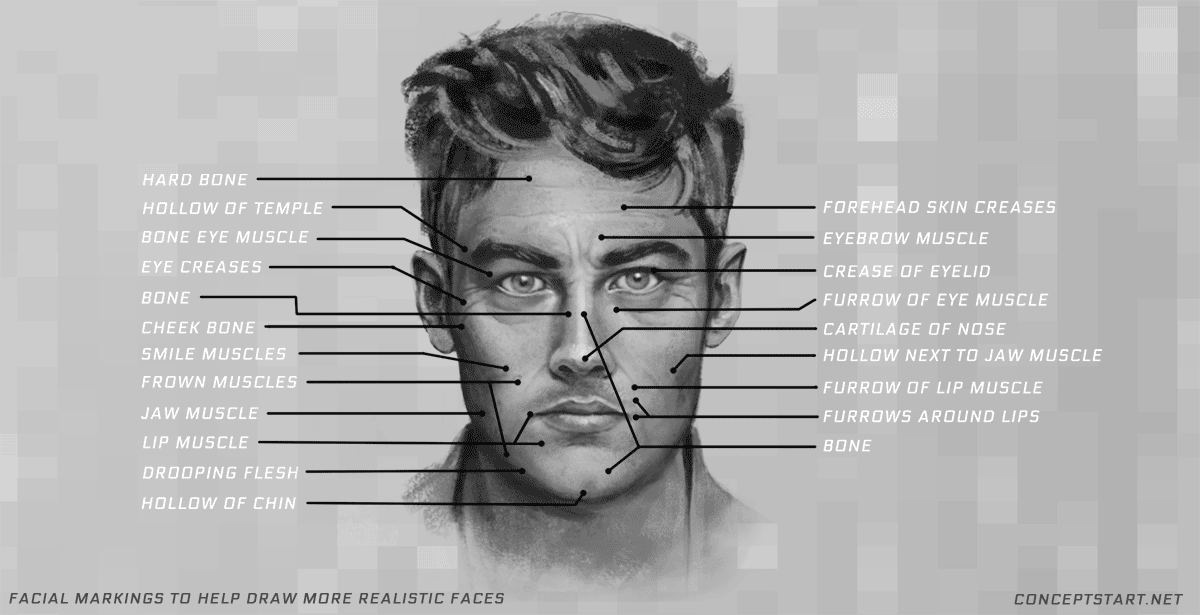
This brings us to facial markings. The initial drawing has been aged to reflect the overall markings listed.
When we begin to memorise the sizes and shapes of muscles and bones that sit beneath the skin, the surface of the face, we’ll then be able to identify the lines, bumps and in the skin and apply them correctly when drawing faces. Know where to place these marks can suggest the form of the face when place correctly.
These facial markings play a huge part in describing the face. Placing them correctly will help to express appropriate emotions, help us to define the volumes of the face and also help us to better shade the drawing by understanding the catchment areas for light and shadow.
Bare in mind, that wrinkles don’t define the look of a person's face, it’s the larger forms such as the bone structure and planes that create the likeness, and in some cases deep creases.
Face Planes
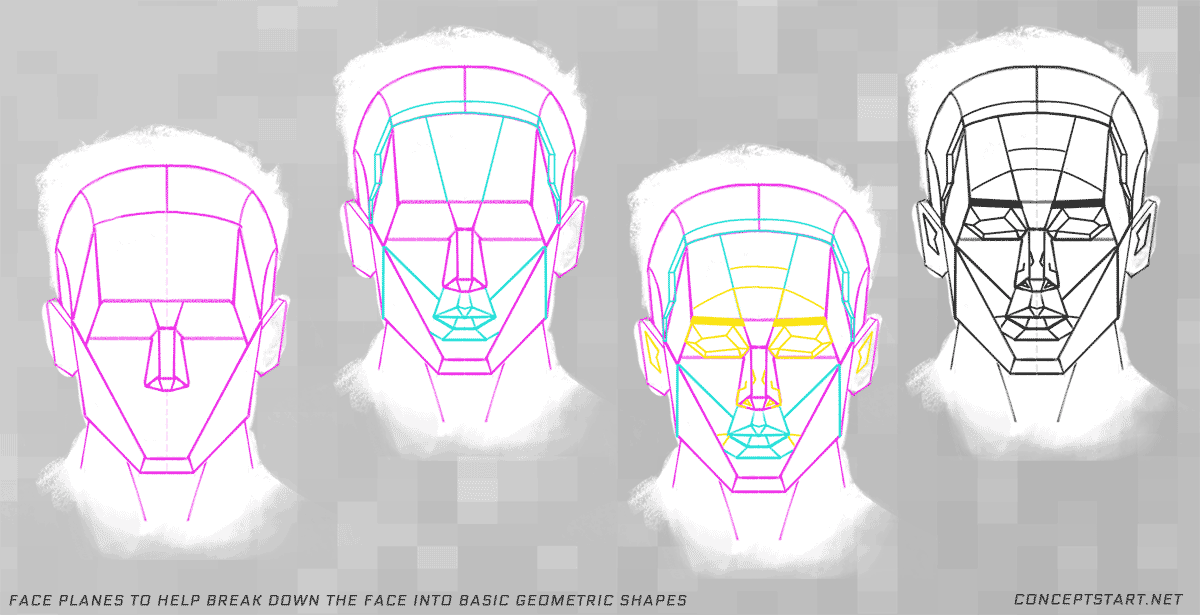
When we break the face down into its core geometric shapes, we will get the face planes. These enable us to see the face in a more simple way, which makes it easier when it comes to drawing and shading the face.
We can start off with the basic planes and then build into these to get more form changes, to describe the shape better. Drawing face planes will help you to understand how the light will catch you subject.
Memorising these face plane changes will serve you no end when drawing faces, especially from imagination. It's another tool to use in case you are stuck, especially when drawing faces from tough angles and foreshortening comes into play, because everything is broken down into smaller chunks and it forces you to think less about the subject as a 'face' but instead a series of basic shapes.
Understanding The Curves Of The Face
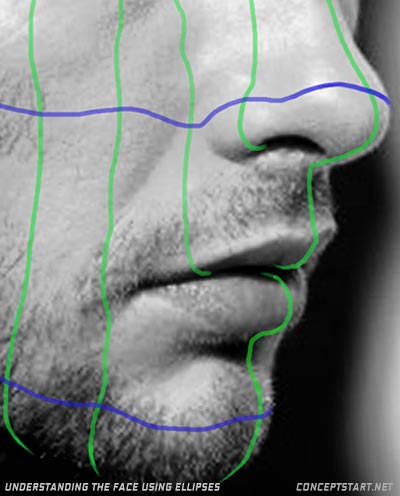 Last episode we looked at how ellipses help us to understand the basic volume of geometric shapes, and now we’re using them to better understand the contours of the face. This will help when shading and to better understand the 3D nature of the face, because it’s not flat!
Eyelids wrap around the eye like Lips wrap around the mouth, they react to the curve and have a volume to them, we need to consider where the face curves, dips, folds and so on when drawing the face. Also, eyes are like balls connected on a pole, they move together at the same time.
Overall, understanding ellipses will help to describe the form, helping us to shade and place our lines more effectively.
Differences Between Male & Female Faces
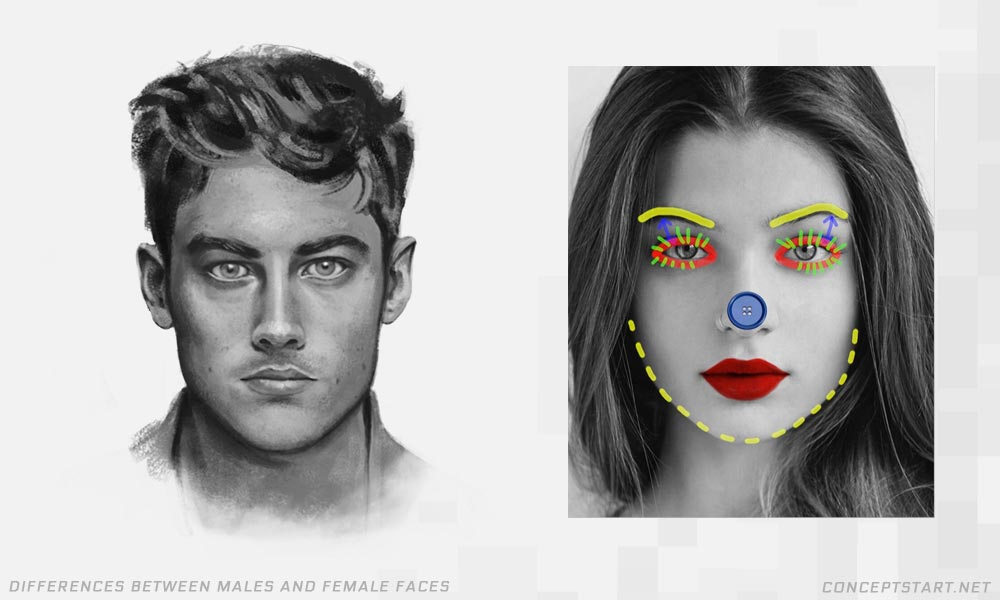
Females are very similar to men in terms of ratio, except there are some key differences you should consider:
- Chin & Bone structure in general is less pronounced, and usually rounder.
- Their eyebrows are placed higher above their eyes
- Their eyes are usually larger, same with their lips being more fuller
- Their Eye lashes are typically longer
- And they have smaller noses!
- Drawing men is more forgiving, as you can distort the ratios more.
Beauty is usually defined by the typical ratio structure, accurate placement of features and symmetry, so be mindful of this.
How to draw Cartoon faces

You’ll notice that I’m always starting with the a vertical and horizontal cross point, where they intersect is where to place the brow line and eyes. The cartoon face practice generator will suggest these coordinates for you, aswell as some shapes and expressions to influence your face drawing!
For these cartoon faces, we can have more fun as we don’t need to consider realism, so we can play with shapes.
Always starting with a circular shape for the base of the head, but then we can use other shapes such as squares or triangles for the shape of the face. If you really want to draw some funny faces then use the funny face generator! There’s some crazy shapes to be explored for some bizarre faces.
So when using the shapes together, we maintain the centre line and run it along the 2nd shape to make it into one large shape. And considering all the information we’ve just gone over, try to draw the features in place begin to express the emotion accordingly.
It’s important to use reference for the expression and type of face, the age of the person and so on... and then we can extrapolate based on reality how it can appear in a more cartoon appearance. Where are the eyebrows positioned? What are the lips doing? Where will the facial markings appear based on the muscles and bones underneath the surface?
If you want to go on and shade these faces, consider drawing in the ellipses to better understand the 3D nature of the face.
Drawing Realistic Faces from imagination
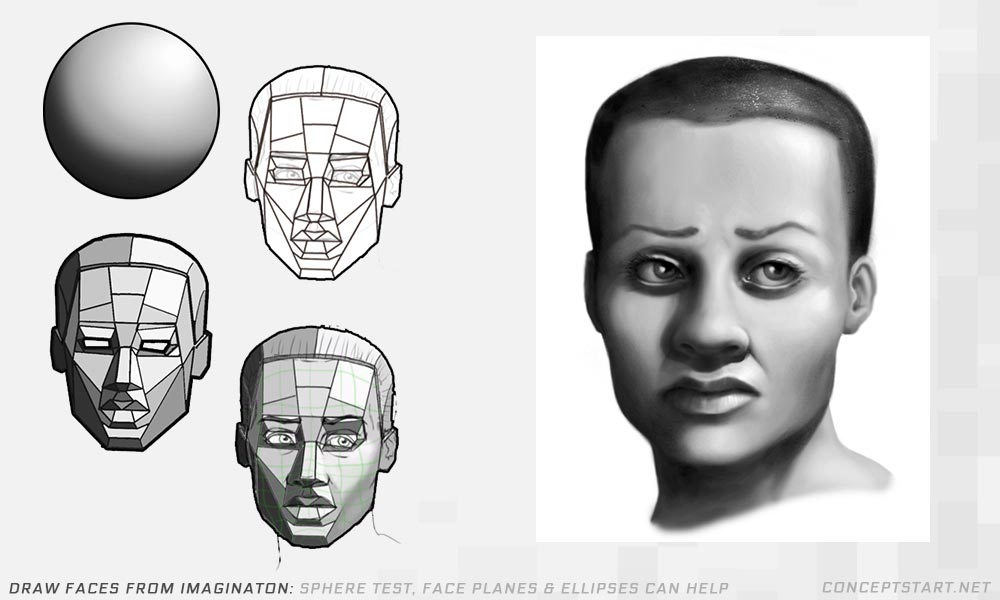
Drawing realistic faces from imagination is very hard! By learning the fundamental bits of information outlined in this article the process will be a lot easier!
In this example (which is by no means perfect) I start out by using the sphere test to determine the value of the light for each plane. (Access the video tutorial if you want to fully understand the sphere test).
The value basically means the how intense the light will appear at that particular point, if we was to score it then 10 would the brightest, and 0 would have no light at all. So we basically utilise the how the light appears on the ball from the given light source and consider where the faces planes are positioned in relation to the light source, we then match the position against a similar point on the sphere to get the value. This will allow for consistent lighting across the face. We can see just how quickly how the face planes becomes 3 dimensional by lighting it up based on the sphere test.
- So we start off with a ball for the head, this is our base like structure.
- Then considering the facial ratios outlined earlier, we take off the sides of the ball and begin to place the centre line markings accordingly to know where to place the main features; the haireline, the browline, nose, mouth and bottom of the chin.
- If you need, it can be a good idea to draw in the skull for more accurate placement of features.)
- The eyes always appear below the brow line which falls on the intersection cross line that we start from.
There are so many videos on how to draw the head, so I won’t go into too much detail but Andrew Loomis describes it best.
Remember to always use reference for the facial expression and features, especially if you’re drawing a specific ethnic group. You can extrapolate the distinct features, or expression and use them in your own drawing. To light this face with accuracy, you can utilise how the light wraps around a ball, this is known as the sphere test, but first I need determine how the planes of the face would appear for this face type. I then go in and apply the appropriate values.
Once this is done, I begin to soften the edges and blend in the transitions of light to dark. Bare in mind this is just the value of light, you still need to take into account the local value (how dark or light the skin is). We can make adjustments where we see fit, from here it’s a case of rinse and repeat.
You can utlise ellipses when blending in the light across the face planes to help you wrap the light around the face.
Conclusion
So my face drawing from imagination didn't turn out to look completely realistic, I think the light is over exposed in parts and the skin tone is overlay fair for the suggested ethnic group, that being said I think it still holds up.
The expression is a little plastic, but I’ll learn from this and apply it to my next one… which is ultimately what it’s all about.. Practicing, reflecting on our mistakes and seeking out how to fix them.
Next Steps to Improvement...
Practice Drawing Faces from various angles!
Drawing accurate faces is tough, especially shading them. The information outlined in this video will help you in your approach.
Bare in mind when drawing you should be sure to memorize the following:
- The Skull
- Muscles in the Face
- Face Planes
- Facial Markings
- Ellipses
So keep practicing drawing faces! I highly recommend trying the Face Drawing Practice generator. There’s thousands of tasks to be prompted with different emotions, light setups, face angles and so on.
It’s designed set drawing tasks and push multiple skills at once whilst learning all of what's outlined in this article and the face drawing tutorial. These drawing tasks could get you to look at the ellipses or facial markings of a particular facial expression, or get you to do a polished study whilst exaggerating the features. In a nutshell, it’s a fun and challenging way to learn how to draw all types of faces, and you could come out with some cool looking art!
There’s also a .PSD file that comes with the generator, so you can basically plot the positions of the cross point to determine which angle to draw the face.
DRAWING TASKS  |
 PREV. TUTORIAL NEXT TUTORIAL PREV. TUTORIAL NEXT TUTORIAL  |
![]() Video Tutorials
Video Tutorials ![]() Task Generators
Task Generators
 Information Information |
GET CRASH COURSE |


